How to import 3D Model in 2020 Design Software?
- Home
- How to import 3D Model in 2020 Design Software?
- How to import 3D Model in 2020 Design Software?

Do you want to use custom 3D Models in 2020 Design? Here is a step by step guide to import 3D Models into 2020 Design software. This method will work with all version.
Step-1
You can visit Sketchup 3D warehouse or 3ddecorative.com to download free 3D models. To download free 3D models from 3ddecorative.com , Simply create free account and open Products > 3D Models then download any model you want to import into design.

Step-2
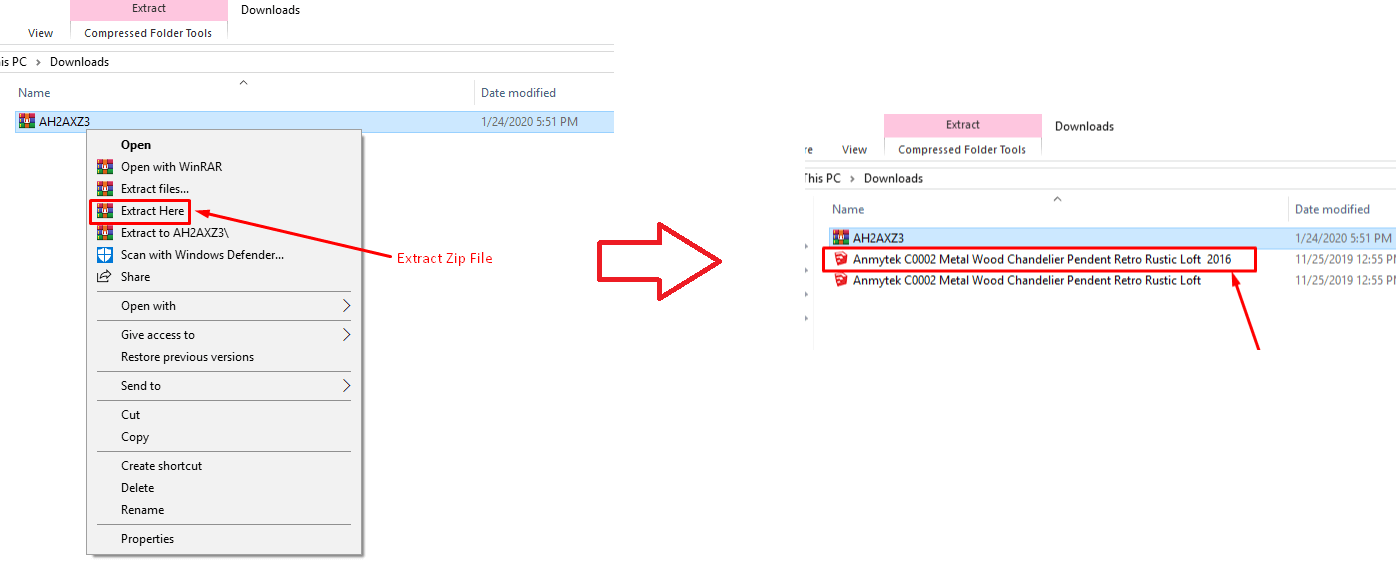
Go to download folder & extract zip file. You will find 2 sketchup files. 2020 Design software version upto V.11 will work with Sketchup 2016 only. If you are using 2020 Design V.12 you can use second files.

Step-3
Now open 2020 Design software and click on Files> Import> Select From Local Storage.

Step-4
Browse downloaded folder and select 3D model files (Please select 2016 for 2020 Design software v.11 and below.)

Are you looking to enhance your designs with detailed 3D models in 2020 Design Software? Importing 3D models can bring a new level of realism and precision to your projects. Follow this step-by-step guide to seamlessly integrate 3D models into your 2020 Design software and elevate your design workflow.
Step 1: Prepare Your 3D Models
Before importing, ensure that your 3D models are in a compatible format. 2020 Design supports several formats, including OBJ, FBX, and 3DS. Verify that your models are correctly textured and scaled to avoid any issues during the import process.
Step 2: Open Your Project in 2020 Design Software
Launch the 2020 Design software and open the project where you want to add your 3D models. Make sure your project is saved to prevent any data loss during the import process.
Step 3: Access the Import Function
Navigate to the “Import” option in the software’s menu. This is usually found under the “File” tab. Click on “Import” to open the import dialog box.
Step 4: Select Your 3D Model
In the import dialog box, browse to the location of your 3D model file. Select the file and click “Open.” The software will begin the import process.
Step 5: Adjust Model Settings
Once the model is imported, you may need to adjust its settings to fit your project’s needs. This includes scaling, rotating, and positioning the model within your design. Use the tools provided by 2020 Design to make these adjustments.
Step 6: Review and Finalize
After positioning your 3D model, review your design to ensure that everything looks as intended. Make any final adjustments if necessary. Save your project to keep the changes.
Tips for Successful Import
- Check Compatibility: Ensure your 3D model files are in a format supported by 2020 Design.
- Optimize Models: Large or complex models can slow down the software. Optimize your models to enhance performance.
- Use High-Quality Textures: Apply high-resolution textures to ensure your models look realistic.
Importing 3D models into 2020 Design Software can significantly enhance the visual quality of your designs. By following these steps, you can easily integrate detailed models into your projects, improving both aesthetics and functionality.

